Getting Started with Chameleon Forms
Getting started
Prerequisites
This library works against netcoreapp3.1. If you are using a different version of .NET Core or are running ASP.NET Core against Full Framework then feel free to raise an issue to discuss opening up broader support. If you are using ASP.NET MVC 5 then check out v3.0.3 of the NuGet package and documentation.
This library works against ASP.NET Core MVC - if you want to use it for Blazor or Razor Pages then feel free to raise an issue to discuss.
Getting it running
Install the NuGet package
Install-Package ChameleonForms -pre(v4 is currently marked beta so you need to include pre-release versions)Register ChameleonForms in your
Startup.csfile:public void ConfigureServices(IServiceCollection services) { ... services.AddMvc(...); ... services.AddChameleonForms(); }Note: you can alter the configuration from the default, see the docs.
Add the following to your
_ViewImports.cshtml:@using ChameleonForms; @using ChameleonForms.Enums; @using ChameleonForms.Component; @addTagHelper ChameleonForms.TagHelpers.*, ChameleonForms @* optional: *@ @addTagHelper ChameleonForms.Templates.TwitterBootstrap3.*, ChameleonFormsCreate your first form, e.g.:
~/Controllers/MyFormController.cs:using System; using System.ComponentModel.DataAnnotations; using Microsoft.AspNetCore.Mvc; namespace MyWebApp.Controllers { public class MyFormViewModel { [Required] public string Name { get; set; } public int FavouriteNumber { get; set; } [DisplayFormat(DataFormatString = "{0:d/M/yyyy}", ApplyFormatInEditMode = true)] public DateTime DateOfBirth { get; set; } } public class MyFormController : Controller { public IActionResult Index() { return View(); } [HttpPost] public IActionResult Index(MyFormViewModel vm) { if (ModelState.IsValid) { // Do stuff return RedirectToAction("Index"); } return View(vm); } } }~/Views/MyForm/Index.cshtml:You have two options for your view - tag helper syntax or the more traditional HTML helper syntax.
@model MyWebApp.Controllers.ViewModel @{ ViewData["Title"] = "My Form"; } <chameleon-form> <form-section heading="About you!?"> <field for="Name" /> <field for="FavouriteNumber" /> <field for="DateOfBirth" /> </form-section> <form-navigation> <submit-button label="Submit" /> </form-navigation> </chameleon-form> @section Scripts { <partial name="_ValidationScriptsPartial" /> @* ... or relevant equivalent *@ }Run it!
(Optional) If you want to add the additional client-side validation support in ChameleonForms (which supports both jquery validate unobtrusive validation and aspnet-validation) then add the following to your
_ValidationScriptsPartial.cshtmlor equivalent file:<script src="~/lib/chameleonforms/unobtrusive-date-validation.chameleonforms.js" asp-append-version="true"></script>(Optional) If you are using Twitter Bootstrap 3 then add the following to your
_ValidationScriptsPartial.cshtml(which only supports jquery validate unobtrusive validation for now):<script src="~/lib/chameleonforms/unobtrusive-twitterbootstrap3-validation.chameleonforms.js" asp-append-version="true"></script>And add the following to your
_Layout.cshtmlor equivalent file:<link href="~/lib/chameleonforms/chameleonforms-twitterbootstrap3.css" rel="stylesheet" type="text/css" asp-append-version="true" />
Show me a basic ChameleonForms example next to its ASP.NET Core MVC counterpart!
Say you had the following view model:
    public class BasicViewModel
    {
        [Required]
        public string RequiredString { get; set; }

        public SomeEnum SomeEnum { get; set; }

        public bool SomeCheckbox { get; set; }
    }
And assuming for a moment you used definition lists to wrap your HTML fields then you might end up with something like this in your Razor view:
<form action="" method="post">
    <fieldset>
        <legend>A form</legend>
        <dl>
            <dt><label asp-for="RequiredString">Some string</label></dt>
            <dd><input asp-for="RequiredString" /> <span asp-validation-for="RequiredString"></span></dd>
            <dt><label asp-for="SomeEnum"></label></dt>
            <dd><select asp-for="SomeEnum" asp-items="Html.GetEnumSelectList<SomeEnum>()"></select> <span asp-validation-for="SomeEnum"></span></dd>
            <dt><label asp-for="SomeCheckbox"></label></dt>
            <dd><label><input asp-for="SomeCheckbox" /> Are you sure?</label> <span asp-validation-for="SomeCheckbox"></span></dd>
        </dl>
    </fieldset>
    <div class="form_navigation">
        <input type="submit" value="Submit" />
    </div>
</form>
The equivalent of this form with out-of-the-box ChameleonForms functionality is:
<chameleon-form>
    <form-section heading="A form">
        <field for="RequiredString" label="Some string" />
        <field for="SomeEnum" />
        <field for="SomeCheckbox" inline-label="Are you sure?" />
    </form-section>
    <form-navigation>
        <submit-button label="Submit" />
    </form-navigation>
</chameleon-form>
What does ChameleonForms do for me?
Chameleon Forms provides an object hierarchy that allows you to declaratively specify the structure of your form. From there:
- It will output the boilerplate template of your form by way of a form template
- It will discern a number of defaults about each field based on inspecting the model metadata for each property
- It will allow you to tweak individual fields by chaining methods using the fluent api off of each field (and some other elements such as submit buttons) declaration
- If gives you the freedom to break out into HTML/Razor anywhere in the form when the template / built-in structures don't meet your needs
- It gives you the ability to apply global conventions across your forms
It makes use of convention over configuration, using statements and an opinionated structure (that is easy enough to opt out of or create your own structure if you like) to make each form consistent and demonstrating a minimum of repetition.
How are ChameleonForms forms structured?
There is a general structure that ChameleonForms encourages with the out-of-the-box setup that can be described by the following diagrams. In reality you can use any structure you like and you can break out into plain old HTML any time you need to, but this explains the default structure that ChameleonForms empowers you to specify by default.
Form
At the top level is the Form - a Form can have any number of Form Components underneath it or, for ultimate flexibility, the separate components that make up a Field on an ad hoc basis(using the Field Element, the Field Label and the Field Validation HTML).
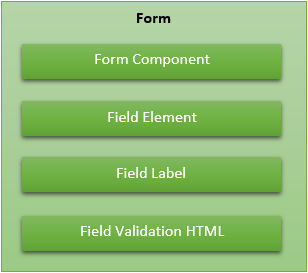
The Form Components that come with ChameleonForms out of the box are:
- Message
- Section
- Navigation
To create a Form simply use the <chameleon-form> tag helper or the BeginChameleonForms extension method off of the Html helper:
<chameleon-form>
    @* The form ... *@
</chameleon-form>
See the Form documentation to understand how to configure the Form.
Individual Field Elements, Field Labels and Field Validation HTML that don't fit in to a standard templated Section (see below) can be output from anywhere within your form like so:
<p><field-label for="SomeCheckbox" label="Hello!" /> <field-element for="SomeCheckbox" /> <field-validation for="SomeCheckbox" /></p>
See the Field Element, Field Label and Field Validation documentation to understand how to configure these components.
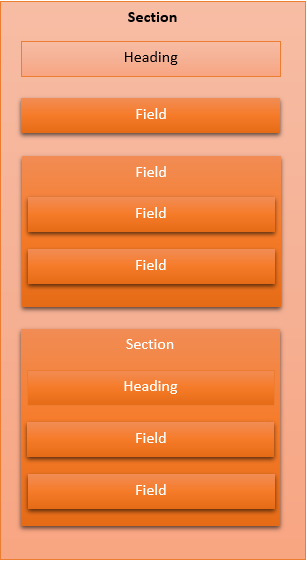
Section
A Section component holds a set of Fields (see below for definition of Field) or nested sections (to no more than one level deep). A Section will start with a Heading. The default form template that comes with Chameleon Forms defines a top-level section as a fieldset.
To create a Section simply use the <form-section> tag helper or the BeginSection extension method off of the Form object (or off of the Section object to create a nested one):
<form-section heading="Basic information">
    <form-section heading="Nested section">
        @* Fields... *@
    </form-section>
    @* Fields... *@
</form-section>
See the Section documentation to understand how to configure the Section.
Field
A Field is a single data collection unit within a Section and comprises of an Element, a Label, Validation HTML and a Field Configuration.
Fields can have other Fields nested within them (to one level deep).
To create a Field simply use a self-closing <field /> tag helper or the FieldFor extension method off of the Section object. To create a parent Field that has nested fields within it then use the <field>...</field> tag helper or the BeginFieldFor extension method off of the Section object to start a Field with nested Fields:
<field for="SomeField" />
<field for="AnotherField">
    <field for="ChildField" />
</field>
See the Section documentation to understand how to configure the Field.
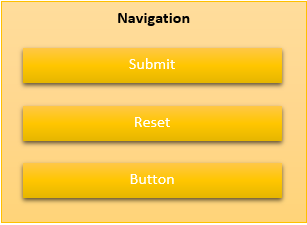
Navigation
A Navigation component will usually be placed at the end of the form (although there is nothing stopping you placing it elsewhere or even multiple times on the form - e.g. top and bottom). The Navigation component allows you to easily create Submit buttons, Reset buttons and normal Buttons.
To create a Navigation simply use the <form-navigation> tag helper or the BeginNavigation extension method off of the Form object:
See the Navigation documentation to understand how to configure the Navigation.
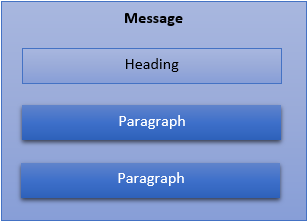
Message
At any point in the form you can create a Message component - a Message always has a type as well as a Heading and inside of the message you can add any content you like, but ChameleonForms gives you the option of easily specifying Message Paragraph's - the HTML for which is defined in your form template.
The message types available are:
- Action - User action required
- Success - Action successful
- Failure - Action failed
- Information - Informational message
- Warning - Warning message
You can output different HTML in your form template depending on the type of message (e.g. different class or completely different HTML structure).
To create a Message simply use the <form-message> tag helper or the BeginMessage extension method off of the Form object:
<form-message type="Success" heading="Submission successful">
    <message-paragraph>Some sort of success message</message-paragraph>
    @* Other Paragraph's or any HTML at all really ... *@
</form-message>
See the Message documentation to understand how to configure the Message.
What terminology is used in ChameleonForms?
Some of the terminology around the structure of ChameleonForms forms are defined above, but following is a more comprehensive list of terms that the library uses:
- Form - The container of a single form
- Form Component - Some sort of container nested within a Form
- Heading - A title given to a Form Component (not all Form Components have one though)
- Message - A message to show the user
- Message Paragraph - A discrete part of a message to show the user
- Section - A grouping for a set of Fields
- Field - A single data collection unit
- Field Element - The HTML that makes up a control to accept data from the user
- Field Label - Text that describes a Field Element to a user (and is linked to a Field Element)
- Field Validation HTML - Markup that acts as a placeholder to display any validation messages for a particular Field Element
- Field Configuration - The configuration for a particular Field, Field Element and/or Field Label
- Navigation - A grouping for a set of Navigation elements
- Navigation Submit - A button that will submit the form
- Navigation Reset - A button that will reset the form to it's initial state
- Navigation Button - A button that has a user-defined behaviour
- Field Generator - A class that generates HTML for a single Field
- Field Generator Handler - A class that generates HTML for a particular type of Field Element
- Form Template - A class that defines the HTML boilerplate to render Forms, Form Components, Fields and Navigation elements
- HTML Attributes - A class that defines a set of HTML attributes to apply to a HTML element